Backing Up Your Raspberry Pi microSD Card
After customizing your favorite game collection, with the absolute best theme and you finally have a microSD card to use with your Raspberry Pi that you are completely happy with! But you’ve heard that microSD cards can be easily corrupted, and all your hard work might be gone in a second if the wrong thing happens! How do you protect yourself from not having any of those precious hours put on your favorite card going to waste? Time to back it up!
There are a number of ways to backup your microSD card with Retropie, or just with any type of system you’ve been using on your Raspberry Pi that you’d like to preserve and protect from a corrupt microSD card. Below, I will explain the way I like to do this, and step by step how to do it yourself, including the software you’ll need to get it done!
Before we go on, this was done on a Windows 10 computer. It will also work on Windows 7. If you can find a software that flashes and reads microSD card for Mac, this process might be adapted to the Mac, however, we don’t have one at hand to test it, so please be aware that the method below was tested and is being used on computers running Windows.
- Install Win32Disk Imager
- Preparing the Backup
- Open Win32Disk Imager
- Backing Up The Card
Many people prefer other tools, such as Balena Etcher, however, I found Win32Disk Imager the one that checks all the boxes for me in usability, and I hardly ever get a corrupted microSD when using this tool, so this is the one I recommend. You can get Win32Disk Imager on the link below:
| Win32Disk Imager on Sourceforge.net |
After you get it, just install the program on your Windows machine. You might need Aministrator privileges to be able to install it.
Insert the microSD card in your computer’s microSD slot. If you don’t have one, try an SD slot with the SD card adapter that comes with your microSD card. If you still don’t see a place to use these, you might need to purchase an adapter from Amazon.
Right after inserting the card on your computer, you might get a number of messages in Windows warning you that the card needs formatting, or that it can’t be read. This is perfectly normal, because most Raspberry Pi cards will have two partitions, one with the “Boot” part that can be read on Windows, the other with the actual content that can only be read on the Raspberry Pi. Feel free to close any error messages and any of the Windows that pop-up right after you insert the card.
Detect which drive letter is related to the “Boot” partition of the card. You’ll need to know that to make a backup of the card you just inserted.
IMPORTANT: Don’t delete any files from the boot partition, and don’t try to format the partition that the system says have issues. Again, these messages are normal.
Open Win32Disk Images. If you are in Windows 10, it will ask for Administrator permission to do so. You can click on YES.
This is what you’ll see when Win32Disk Imager opens:
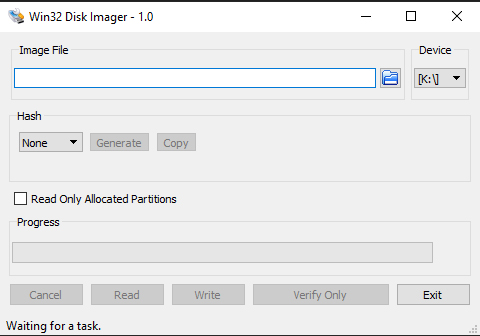
With the microSD card inserted, and Win32DiskImager ready to go, click on the “Device” drop-down menu to select the device where the microSD card that needs to be backed up is inserted.
After you find it, you need to give a location and a name to your backup image that is going to be created. To do so, click on the blue folder, and select a location and a name for your backup image, let’s say D:/Retropie/backup.img.
IMPORTANT: Make sure the filename ends with .img.
ATTENTION: This should be a non-existent file! You are creating a new one with Win32DiskImager! Don’t select another image on your drive, because it will damage or overwrite it! Also, make sure your computer’s hard drive has enough space for the image file that is going to be created.
Make sure everything is fine, and then click on the READ button to start creating the image in your hard drive.
OUR SUGGESTION: Now, this is more a suggestion than a rule, but avoid using the computer when the image is being created. If you have a powerful rig, you’ll probably can do other things when the image is being created, however, if your computer is just a regular one, let it does it’s thing and create the image for you before you do anything on it.
32GB cards might take 30 to 45 minutes, 128GB cards 1 to 2 hours and so forth. 400GB cards might take about 5 hours to backup, so be aware before you start. Interrupting the process in the middle might corrupt both the card and the card image that is being created on your computer, so be careful.
The program will pop an OK screen after you are done! Congratulations, your card is fully backed up and you should have an .IMG file on your hard drive that you can use to restore your precious Raspberry Pi image whenever you want!